Order Online

Wednesday, December 16, 2015

December 2015 Challenge - Impression Mat Soap

December 2015 Challenge - Impression Mat Soaps

Inspired by Amy Warden Soap Challenges!
Here is my final Entry !!!
Beach Soaps
 I actually started preparing 2 weeks ago. My first attempt at making a silicone mold I used a 100% silicone made by GE I purchased from Lowes.
 I was able to get the silicone to harden up enough to work with in the soapy water. I happened to use Ajax dish soap since it's all I had on hand at the time. I use quite a heavy dose of it, so the water was very sudsy.
(here are some links to helpful videos on the subject of diy silicone molds: (you may have to copy/paste)
https://www.youtube.com/watch?v=C6z3_dcP1_M
https://www.youtube.com/watch?v=IlptOsHth_s 
(I added glycerin to a second soap & silicone attempt later & it helped it set up much faster!)

 I pressed & worked my silicone into a tile square I had picked up from Lowes for less than $5.00 (I like to experiment cheap!). I then set it aside to cure. Well the next morning my saran wrap had gotten blow over onto the top, so I then had to leave it in place or risk destroying my mat. It was still VERY soft and sticky!!! I was having doubts about success at that point. 3 days later I pulled the still tacky silicone from my tiles, I figured it had to come off one way or the other - so I hurried the process a bit. I really thought it was a lost cause on this try! surprisingly it was (mostly) intact. 
 After sitting it on the fridge for several days the silicone finally cured! I trimmed the mat to make usable portions. It was very thin, but super flexible so I am excited to try it!
***FYI the smooth glass tiles worked great to create a mold - the silicone didn't stick to it.

 Since the 1st Silicone mat didn't appear at first to be an option to use for the challenge - I had moved ahead with getting a mold kit from Michael's (%40 off coupon - yay!) This kit was super easy to use and worked wonderfully! It was called "Amazing Mold Rubber" I chose it over the other kit as this has a longer working time.
I use as my mold fodder a selection of seashells and pebbles I had around. I happened to use bubble wrap as my material to hot glue them to. In hindsight this was NOT the greatest idea. I had the idea the bubbles would add interest, but even though I used a lot of hot glue on my items, there were still several gaps that allowed my mold rubber underneath. I was able to clean it up, but it took a lot of careful work with a sharp razor blade!
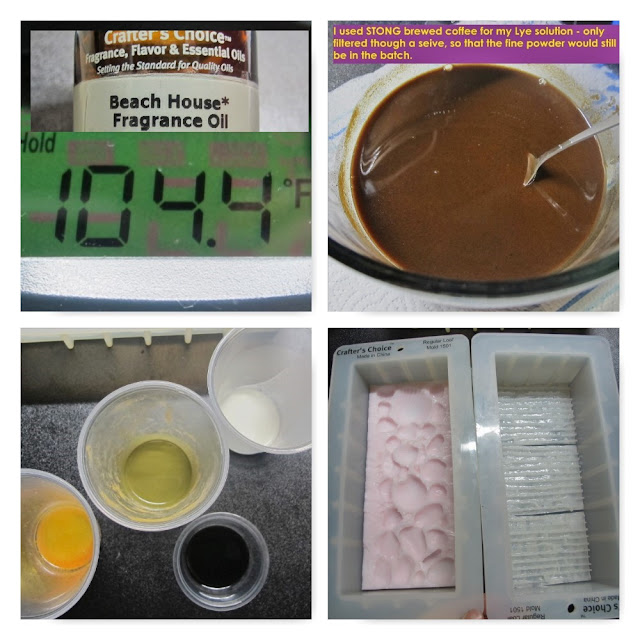
 I wanted a sandy color with some slight grainy texture. I didn't have any actual sand so I chose to color with Coffee as my Lye liquid. I boiled in in a pan then used a sieve to filter out only the large grounds. The silty coffee specks stayed in my liquid. I added 1 tsp course sea salt to my lye water before adding the lye. (2 lb. soap recipe). I chose natural colors, with some gold mica in oil to dab on in places.
I didn't get photos, of the in-between, but I put spots of color in the rocks and shells to give variety to the look. I made two loaves, one with my tile line silicone mold and one with my Beach themed rubber mold.

 After 13 hours I was able to gently remove my loaves from the main mold. I let them sit about 4 hours more before attempting to pull the impression mats from the loaves.
* The tile line mat made from silicone was easy to remove. I just took my time. I like the rustic look of it.
**The Beach themed mat was trickier. Even tho I had used salt in my lye water, the soap was still soft enough that a couple of my rocks wanted to break. All and all I am very pleased with the look of it! I plan on experimenting more with darker/more colors with this one! Melt and pour is good in this, as I experimented with that first as a trial run. I did trim a couple of trouble areason the rubber mold to make CP come out better next time. Also a harder recipe is in order.

 I am so excited to see what everyone else came up with!
Thank you again to Amy Warden for such a fun and helpful Challenge! I definitely recommend them to any Soaper wanted to really learn from others and be pushed to try new things!
I hope the Best to all - Have a fantastic day! : )
Eva


Wednesday, November 11, 2015

Tall & Skinny Shimmy - Amy's November Soap Club Challenge

The Tall and Skinny Shimmy 
November Soap Club Challenge 

Hello everybody!
Fantastic to be back for another of Amy's Soap Challenge Club adventures. Hooray!

 This months challenge is the Tall and Skinny Shimmy, shown to us so beautifully by Tatiana Serko. I really appreciate her easy to follow instructions.
So after 2 tries with batter evidently not the right consistency, I finally had a bit of a shimmy in my 3rd batch, so that's what I went with for my entry. It's not as curvy as I had hoped, but hey, I had super fun with this anyway.
Here's my final entry photo. 


I used a wonderful essential oil blend called "Bliss" described as: "A feminine combination of natural jasmine, lavender, orange, rose and ylang. " it is divine! I used 1 oz EO for 2 lbs oils.
I wanted to choose a flowery color scheme with a pastel hue.
 Perhaps my batter was still too thin. I had even tried using using Pomace O.O. this time to see what would happen. I did hand stir each time with a whisk. In the future I may go for the stick blender, even tho I enjoyed not having to clean it by hand stirring! 


***************************************************

ROUND 2 
 Peppermint tree!
                             My husband actually like this one. He said it looks like a peppermint plant when held upside down. It also reminds me of a Pine tree. No shimmy, but I still like the different pattern. I only 
I had used white as an in-between for the other colors on both of my 1st and 2nd batches. In this Peppermint EO soap, it seemed to want to dance a little, but maybe the white layer diluted the pattern.  I'm not sure. My 3rd try I will only use the solid colors.  Also, I plan on using fewer layers.


******************************************************************
ROUND 1
Made to Measure - a more manly scent.
  Even tho I enjoy the river-like flow of this pattern, It's not a shimmy at all! --I think my batter was just toooo thin this time. I was worried it would start thickening more than it did. Even the Fragrance didn't seem to speed it up at all. The white sections did thicken up more making it look chunky in comparison.
 Oh well, I'll just have to make more .... and i'm not really to sad either, more soapy fun!
    I had a request for some more manly scents to choose from. I am super excited about this one. It is really fresh, yet woodsy, and soft at the same time. I chose colors as a blue gradient to try.

All and all, I REALLY like this technique!! It is amazing to me how much the thickness of the batter affects to pattern. I plan on experimenting more with the taller walls, pouring differently on purpose - just to see what happens. 
THANK YOU very much to Amy and Tatiana for a wonderful lesson and experience!
 I look forward to seeing every-ones imaginative creations! 
Happy day to all! ... Eva

Friday, October 16, 2015

October Soap Challenge - water replacement and natural colors.

 Hello my name is Eva, and here's my final entry photo for Amy Wardens October Soap Challenge: Water replacement, and Natural colors.
I'm calling it 'Calico Lemongrass'.


 It's time to tell all about my adventure with my all natural batch with 100 percent water replacement for my lye solution.

 Wow, what a roller-coaster ride it ended up being - and I have pictures to prove it!
For the scent I chose 'Mother Earth' blend - an all essential oil blend from Wholesale Supplies Plus.
The batch Oil was 100% Olive Oil. 

I chose Cucumber juice as my water replacement. Cucumbers are part of the squash family and are known to have many health benefits. 
Benefits include: antioxidant and anti-inflammatory properties. 
*The vitamin nutrients most likely will not survive the Lye however I am curious what color and texture qualities this will add to my soap.

 Here are links for a breakdown of Cucumber nutrients and research... (you may need to copy and paste)
http://www.whfoods.com/genpage.php?tname=foodspice&dbid=42#preptips

http://www.whfoods.com/genpage.php?tname=nutrientprofile&dbid=62

 Since I wasn't sure my Cucumbers had been sprayed in cultivation, I chose not to include the skin in my juice, to avoid contaminates. I used a juicer that separated the pulp, so this was fairly clear juice. 
 I froze the juice before adding the lye. 
 For the color layer I chose, to add:
*Kale juice to my green to try as it seems to have such a deep color to it. I did not reduce any liquid from this juice.
*Carrot juice that I reduced down to remove some water - on the stove -to strengthen the color. I like the thought of it being a nutrient rich food, that is great for the skin as well having Retinol and multiple minerals. 
 Info on carrots can be found at:
http://www.whfoods.com/genpage.php?tname=foodspice&dbid=42#preptips
*Lemon zest - about 1 tsp. - steeped in 1 Tbsp. of water to release some color, then reduced water by 1/2.
* t tsp. Paprika steeped in 1 Tbsp. of water then reduced to a thin paste. 

I didn't see alot of color definition when I put the colors into the soap batter. 


NOW FOR SOME LESSONS LEARNED!!! 
I decided after molding to put my loaf in a warm oven to assist complete gel stage as I had combined at a low temp. It seemed a good idea at the time. However, my bottom / green layer that had the most liquid, well .... liquefied so badly, I could actually see bubbles move around in the mold. Egad!
I un-molded th next day and cut off most of the green. The other layers seems solid and salvage worthy.  Note to self - less liquid in colors - and maybe no added heat - ill have to experiment with that another time.
 Then I had the thought to speed up the drying out of the trimmed loaf by setting it in the sun for 'a bit'. A few hours later, before going to work I remembered my loaf. Meltdown!!! NEVER leave soap in the direct sun and forget about it!
After letting the loaf set overnight to solidify, I cut it up into chunks to use as embeds. 
The colors seem to be darkening slightly from what they originally looked in the batter. Hooray!

I again used Cucumber juice as my lye liquid replacement, and Olive Oil. I did combine at a higher temp this time - 105 degrees.
 I did not have any Mother Earth EO left - so I used Lemongrass, and Lavender to complement the embed scent.
 The top was too plain, so I zested some lemon peel and sprinkled it on top. 
I can't wait to see how it turn out when I cut!

Here are expanded views of the loaf as it was cut:

I've really enjoyed this challenge! I feel more inspired to experiment with my Lye liquids, and natural colors. I look forward to seeing what everyone else came up with and reading how they did it!
 Thank you & Happy day to all!

Wednesday, September 16, 2015

soap-challenge-club-logo230

Hello again,

 Finally the day to present for Amy's September Soap Challenge - the Clyde Slide!

Here is my final entry photo - Arabian Spice - the Clyde Slide' technique  : )


I really enjoyed this! I also and in great anticipation to see everyone else's results.

 I have so much to learn and welcome advice from others that may want to share constructive criticism. 
 I wasn't sure of the best way to display my soaps. I like all of the bars and couldn't pick just one favorite so you get to see all of them!

I hope they pass for an entry   ... Thanks again Amy for this fantastic way to experiment and be learn so much for others! Thanks to  Clyde to for your demonstrations. 
Very well done both of you!


 I found a bunch of leaves in our yard that are already changing from our recent drops of temperature at night here in Kentucky.
I think we'll have a fantastic Fall color show this year since here in the central states we had plenty of rain. I wish we could share with the west coast!


These swirls remind me of watching clouds sometimes, I think I see faces or other designs. ?? 


Happy day to all of you! 

September 20th update

HI again -
My Arabian Spice batch has been aging few day now and finally the brown background is starting to develop more. Here is a photo from today.


The colors are showing more now. I have learned to allow more time for the Vanilla to develop color, at least with this recipe. Let the adventures continue ... !
 
 
I have so enjoyed this challenge and will keep an eye out for the next one. I  have learned a lot reading all you other soapers posts. Thanks for sharing!


Monday, September 14, 2015

Hi Everyone,

 I am Eva Edmonds and I am a novice Soap Maker living in Kentucky.
I was introduced to my soaping adventures by a friend who invited me to a hands on soap making class in Clarksville TN. I LOVED it!
 Being more on the practical side I am drawn more to crafts that were useful, yet not terrible lengthy. No Quilt maker genes in me - but oh what skills Quilters have, the color blends, wonderful designs and practicality of a usable product one can enjoy.
Sooo, Here in soap making I can play with color, create imaginative patterns, and it's ok to be a bit messy too! All in a couple of days time (besides the curing) What's not to love? THEN  my family can use it and give it as gifts - Yay!

 So while I have only made 15 or so batches total over 3 years, I am ready to step it up a little.
I noticed Amy Wardens Soap challenges a few months ago, but couldn't bring myself to enter.

I have loved the examples and sharing of experience of Amy and Clyde and soo many other soap artists - Thank you for your wonderful and selfless inspiration!

This is the month!!! September 2015 Soap Challenge using the Clyde Slide. 
A big month of firsts for me. My first Soap Challenge, my first Pinterest Board, AND my first Blog attempt. Thankfully I do already know how to operate a camera & edit photos!  (Thanks EBay)

THE PLAN -
4 colors representing fall foliage colors. Green, Yellow, Orange, and Burgundy/Red.
I am using a scent with Vanilla ONLY in my uncolored batter to give the colors a nice brown background to (hopefully) stand out against. I will use the example Clyde of Vibrant Soaps used with a double sided pour.


So on the 11th I readied my 2 lb batch. Colors mixed, hopeful ideas of a pour sequence in my head, I geared up and passed the point of no return.... in goes the lye solution to the oils. Ahh the satisfaction of the whirring stick blender, and beginnings of saponification/ emulsion.
 So as soon as I am sure of saponification at a light trace, I separated my unscented batter into my color cups.
 I had chosen Arabian Spice fragrance by Brambleberry as a Fall scent to match my colors.
I didn't notice any acceleration from my fragrance. (Whew!)
 I was a little nervous and didn't notice until later that my color pours weren't exactly side to side but they still seemed to go ok. I chose my sequence a Green, Yellow, Orange, then Red. I wish I had made more Green, it didn't seem to go as far.
 My batter was thickening up - so the last couple of color shots were kind of clumpy and went  out of place in my rush to beat the clock. But all in all I am pleased I made it though the 'in the pot stage and am not ready to mold it.


With the translucent silicone the pattern swirl is visible enough to make me super excited to see the results! Ok ... the wait is on...

 The unveiling ...

I like this fragrance - a bit like a Gingerbread cookie only with a tad of clove and brown sugar.
I could see some vanilla browning on top where the loaf had more exposure to the air, but not much on the fresh cut. I am curious what changes a few hour of curing will bring. I REALLY want the color to darken for my challenge presentation.
Wait and see ...
I cut the loaf and set the bars so both sides can be seen in the order they were cut.
Very cool pattern!!! I have never tried the in the pot swirl before (another 1st : )  )
I like it a lot.
 Now I will have to choose one.

To be continued ...