Order Online

Saturday, October 15, 2016

Rain Forest Soaps ~ Octobers Wood Grain Soap Challenge

~ Great Cakes Soapworks Soap Challenge ~
By Amy Warden

OCTOBER ~ Wood Grain technique


My Entry! ~ Rain Forest Wood Soap


I used a Friends Homemade Wild Cherry Wine for my Lye Liquid. I planned on this being my base color ~ a tan/pink beige.   It turned a slight orange after adding the Lye. I did not freeze it first, just chilled and kept bowl in cool water while mixing lye in.

I used 3/4 ounce essential oils. 99%  was a lovely EO blend called 'Rainforest' by Crafters Choice. I added only 5 drops of Nutmeg EO, just add a little warm dimension. 
 Other colors created with Activated Charcoal, and Indego Powder ~ added each to one 3rd batter. I left the other portion plain color.
My oils were 100% Coconut oil, with only 1/2 oz of Castor added. 
*Average combine temp was 110 degrees.


After mixing in colors by hand, the batter was thickening quicker than i expected! I kept stirring the batters to keep as fluid as possible.


I used a thin skewer to run back & forth along the 'grain' one time. Then made little circles here and there for knots.

Below are the loaf after I planed it with a cheese slicer. Then I made some bigger cuts deciding which way was best.

 Some finish cuts shots

Another fun challenge! I look forward to seeing everyone elses soaps too!
Thanks to Amy Warden for Hosting this great learning experience!

Have a nice day ! ~ Eva

Saturday, September 17, 2016

Great Cakes Soap Challenge ~ Piping technique!

Great Cakes Soapworks Challenge by Amy Warden

~ Piping Technique! ~ 
Floral Guest Soaps ~ White Tea & Ginger scent

  It's time for another of Great Cakes Soapworks fantastic challenges!  For me this was really hard! I have always admired Piped soaps, but had not really been driven to try doing it. That is why entering these challenges are soooo awesome ~ they make me go where i have never gone before in my soapy universe! :)

 I chose to try a floral guest soap theme. 

Here is my entry! 


 Using a Lard 37%, Coconut 25%, Castor 12.5%, Olive Oil 25%. I combine Lye & Oils at low temp, close to 80-85 degrees.
 I used Brambleberrys White Tea & Ginger fragrance in the main batter ~ Awesome scent!
 The tips I used (experimented with) were # 67, 98, 101. I didn't have a smooth 'smile" tip, so my Chrysanthemums look more like Hens & Chicks!! Oh well ~ i like hens & chicks :))
 The batter was still too mushy when I first put it in the bags, I just had to keep trying & experiment. It took close to 1 hr ++ to get a consistency that would hold shape. 

 The texture looked weird & grainy to me. I never did stick blend at all, so I wonder if that had something to do with it? *I plan on using a blender next time I try piping to compare the texture.
 I didn't take pics of all the first disasters, and the first ones that resembled anything did not show any of the color variation from the mixed bag. So I didn't use them.
 I let my flowers & leaves set up separately. It took a few day actually for me to get back to making the bases in the guest mold. I just placed the leaves & flowers on the soap I blended to a thick trace before pouring/glopping into the mold.
 I like the look of the little guest soaps! I don't think they would be very practical to use tho. Once I get better at lower profile shapes I will try again!
 More finished photos!

 I have a loooong way to go learning to pipe soaps better, but have loved trying! 

 Thanks to Amy Warden for hosting this challenge ~ fantastic learning opportunity ~ as always~ :))

 Also thanks to all those that shared such fantastic tips to learn with.
Have a wonderful Day ~ Eva

Saturday, August 13, 2016

Great Cakes Soapworks Challenge ~ Dancing Funnels

Great Cakes Soap Technique Challenge for August 2016
Hosted by ~  Amy Warden

 ~ Dancing Funnels ~
taught by Tatsiana Serko of:  Creative Soap by Steso

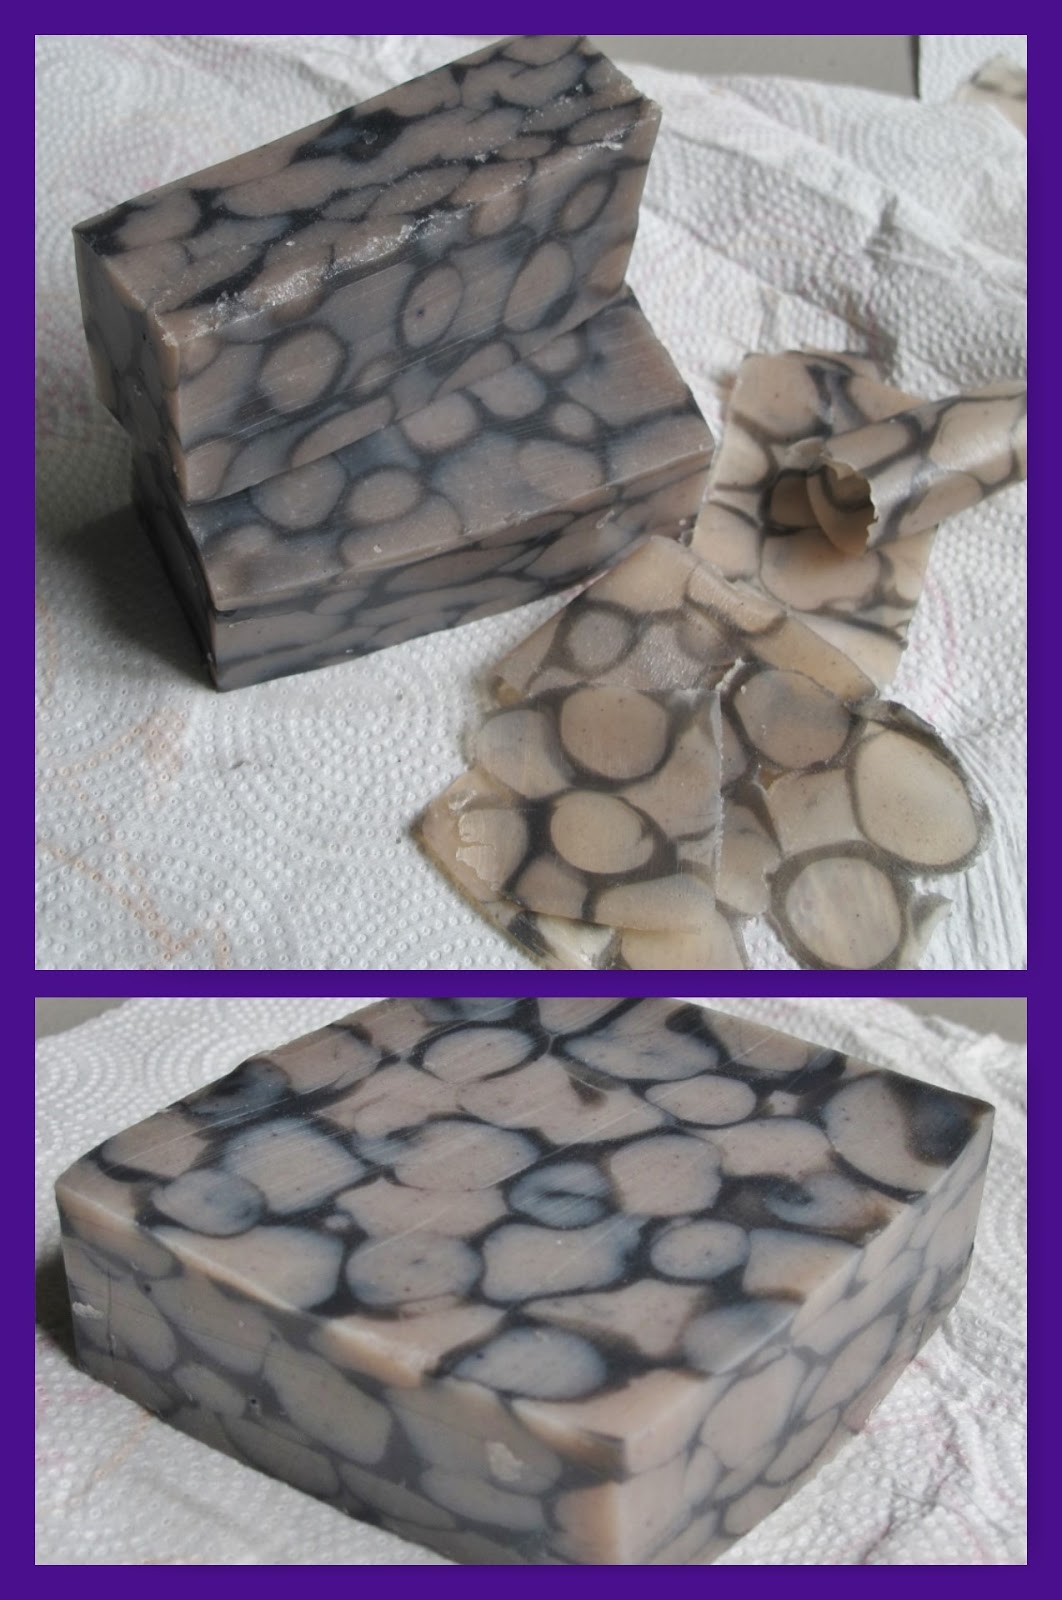
 Here is my entry photo! 

 I chose to go with the all Natural category, as I really want  to expand my skills in this department!
I just have not forced my self to learn to infuse them and put them to use. Better late than never right? :)
 My very first attempt wasn't really serious, it was a combination of  Dancing funnel (mainly just using the bottles) on the bottom and swirl on upper half of the loaf. I like the variation using the sqeeze bottles can add to the design. (The pic of this is my Lemon Eucalyptus & Ylang bar on instagram.(@evassoapbasket).
 My first serious attempt I used Safflower petals in the Lye water. I should have either used more petals or a different infusion method i think. I did not get very much color out of this, using 2 heaped tsp of petals to the lye water for a 1# batch of oils. What color shows in the Lye bowl, disappeared once mixed with the oils. :(.   The border color was made adding Indigo pwdr to 1/4 or the batter.
(oils were: olive, coconut, castor, and shea butter)

 While I had reached emulsion, I found it way to thin. The borders would fade away so easily when adding the center. Next time i will make this portion darker! I did pour the lye water through a strainer to catch the petals. I did not take a pic of my first batch bars yet. Will add later hopefully. They just became a blurred mess from being too runny. Oh well, it's still good soap, and a fine learning experience! They may become interesting embeds : )

 My second and final try, as I was out of time... 
 Oils were 100% Coconut oil with a superfat of 22%. Scent was created using 9ml Tea Tree, 9ml Basil, and 6ml Tangerine essential oils. It smells awesome! After I added the Tangerine, I though it might have been a bad idea due to the orangey color of the oil. It likely affected the color of my batter slightly.
 Heres some pics of the process: 

Alkanet in the Lye water for 20 min while cooling. Strained lye solution while adding to the oils. The color in the bowl is mostly from the powder suspended in the water. It really did not leach out as much as I though. (another lesson!!)


After bringing to a thin trace (I did used the blender a short bit this time.) I divided the batter into my pour bottles, and added the Activated charcoal to 1 bottle (1/4 of the batter).
 1st pic is my first layer in the bottom of my mold. (a cut off Almond mild carton ~ pretty fancy huh?)
 As the batter was thickening up the last 3-4 'layers' i had to lightly tamp it to flatten my surface as I went.
 I recently brainstormed my own 'Brick Oven" to help my soap gel. Using a countertop burner (with a flat/solid surface) Starting close to an hour ahead of time, I placed two cement house bricks on it & turned it on just enough I could tell it was warming them slowly and evenly. By the time I was done with my pour they were close to 180 degrees. I turned it off, set my mold on them and covered it with a cardboard box. 


 I was able to cut after 5 & 1/2 hours (this is why is tried 100% coconut oil!!) I did this this morning, and final entries are 2:00 today!!!


My 'loaf' after unmolding and planing with a cheese slicer. Then another final cut pic.
I like using the squeeze bottles for the interesting affects for sure.
Thank to Tatsiana Serko for sharing this wonderful technique! : ) My appreciation and thanks to Amy Warden also for hosting this terrific learning platform! : )
I look forward, as always to seeing all the other awsome soaps! I always learn tons!

Have a wonderful day everyone! ~ Eva


Sunday, June 12, 2016

Great Cakes Soap Challenge ~ June ~ Sculpted Soap Technique

Great Cake Soapworks Challenge
June ~ Sculpted Soap Technique
French Horn design Soaps

 This months challenge is one I am so happy to have been 'encouraged' to try. It involves using cut out, pre-shaped pieces to drag through stiff soap batter to create a "Sculpted" design. I allows one to carve designs into your loaf of soap that really cannot be achieved otherwise.
 I had been wanting to figure out how to make a soap with a French Horn design for a long time. I though this would be a fun shape to try. 

 (I do not own this Horn! ***This is an original photo from website: www.rjmartz.com ~ they have a beautiful collection of these wonderful instruments.)


 Why a Horn? I Have always loved Brass instruments and when I had the opportunity to switch from Trumpet & learn Horn in middle school I jumped at the opportunity. I still have one to play around on,just for fun but never play for anyone but my husband. (He's so patient !!!!  : )) 
 Anyway that's my inspiration for my 1st try. I have other ideas in my head to try, like a fish design for my fish/hunt bars I make. If I have time to get it done before entries end and I post i'll include it. I wanted to get this post going though since time goes sooo fast!!!
 I would like a better entry but this is what I have at this point, here's my scupted soap story  #1.


 I had been making other batches of soap for a nearby Flea Market booth some friends have near Grand Rivers, KY. So I had made my Heart embed with Ed Hardy Fragrance from that soap batch. Then, encased that in a Lemongrass Round embed from batter from another Soap batch. (This was all in June) So I was set with a Round center for my Horn. ( I was inspired to use this by Amy & her Daughters eye example! ~ thanks Amy!)
 For my final fragrance I chose Lemon, Sage & Ginger EO & FO blend + 1/2 ms of Cedarwood. It soaped wonderfully and went perfect with the Lemongrass scent of my embed. Yay! Also didn't discolor.
 I mixed my lye water full water this time in my recipe ~ I usually do a 10% discount. My average combine temp was 90 degrees.  
 I used Black oxide and Activated Charcoal for my blacks. Kaolin Clay for the White, and a Blend of Copper Sparkle Mica, Ivory lace Sparkle Mica + a bit of copper/gold glitter for my 'metal' of the Horn itself. I've never really seen a Horn this color, but hey, it's soap and I did my best!


 I had first tried to use regular cardboard for my shapers. It was difficult to cut & I still didn't have as smooth of edges as I wanted.


So I tried a thinner cardboard as seen below. This seemed to create a better detailed shape. I covered it in packing tape to attempt to prevent it becoming soggy later in use.
So far so good.


My soap batter was made of 33 oz of Brambleberrie's Basic Quick mix. I added 1 oz of Regular Olive oil (not pomace) I know from experience, the Basic mix allows minimal swirls and firms up well once it begins thickening trace. The Olive oil was to create a little more malleable firmness to shape into, and keep it from turning to hard too soon.


 It all started well, I mixed only to very thin trace and divided into 3 pitchers. I did add 2 tsp. Kaolin clay to the whole batch first.
 ** While I made an honest effort to estimate the amount needed for each section ~ boy was I wrong!!!
 I had to quickly make more black to finish the thicker section on the left. That's why in the finished pix, there is a darker layer. I tried to get it ~ was just trying to get it made quickly at that point.
 After that, well it just got crazy & I not only forgot to get any pix, but was so messy I would have had to clean up before I could touch my camera!!
 I layed down my first Copper layer, and scraped, it seemed ok, but I could tell I would run out of this color also ~ yikes ~ beginning to get anxious now : ) 
 There was no really gentle way to place the embed, so I got as close in as I could and had to let it fall into place hoping it didn't break through the bottom Copper layer.
 My batter was remaining soft enough still to be able to whip up more Copper. 
The higher tip of my Horn bell flare was wanting to bend in a bit. I was having alot of difficulty getting it the way I wanted. So I started to add the White layer into the shape underneath the Bell to support it & help it hold shape. During this some other colors blurred in and I was feeling frustrated ~ was this even going to work at all???
 I finally ended up using the original Cardboard shaper ~ the thinner one had disintegrated in the middle. (i'm so glad i didn't throw out the prototype !) 
 By this time the remaining batter I had planned on creating a domed top with was getting solid, so I just shlucked it into a smaller mold and squished it down. 
 I was so happy to finally be done with this wild ride I had to celebrate and throw glitter (confetti!!) on top. I made the top as flat as I could without pressing into the shapes just under the surface.


  I was so anxious to see how the soap turned out... did it even resemble a Horn after the torture I put is through? Yes! Yes! Yes! 
 Not perfect but I am relieved. My husband said he could recognize it, though it could easily be a Snail if the neck was bigger. Ha! He's right, but that's ok. 
 I included a pic of our Kitty ~ "Boogie" with a Horn I used to have.


 I am so excited to see what wonderful things all of you other Soap Shapers have dreamed up! 
 Thank you to Amy for all that you do. Also Claudia for sharing a treasure of a trick to using in our soapy toolbox!

 Have a wonderful day all of you!  : )
 ~ Eva


Friday, May 13, 2016

Great Cakes Soap Challenge ~ May Teardrop Technique

May 2016 Challenge ~ Teardrop Technique
hosted by Great Cakes Soapworks


Balloon Teardrop Soaps

I went through so many options for my Teardrop inspiration! I finally felt most inspired by Hot air Balloons ~ I have always loved the bright colors and designs. While I wasn't yet able to completely capture the way the stripes lay on Balloons, I really like how the Teardrop technique lends to the Balloon shape! 
Here's some of my inspiration:


 I did 2 batches that were very similar in that I used the same basic colors and scent. Both batches were close to 105 degrees.  I did a 2# recipe and used 3/4 oz of the Valencia FO. I really liked this fragrance! It is a super fresh Citrus scent with more Tangerine like notes. It may have sped up the trace a little tho ~ not terribly.

I attempted my first go at the teardrop and it appeared to be too flat. I think my mold was too deep and it felt awkward to me my first attempt. So since I had plenty of room in the same mold I chose to go ahead and stack another try on top. 
 I did not insulate this first one, so I don't believe it went through trace. 

This is what the loaf looked like before cutting.


Batch #2 

I wanted batch #2 to go through gel
, so I put my little cardboard molds in one of my wooden molds then covered the top also.


I did use more Ultramarine blue for the sky, but the other colors I used the same in the batter. Going thru Gel stage seems to have helped the colors pop more in this batch. Yay!


 Here is my Soapy Balloon Festival Pic! If you ever have a chance to see a real Balloon Festival ~ go for it! It is truly awesome, especially right at Sunrise with the sun lighting them up, or at night when the torches make the colors glow from within : ).

This Teardrop Challenge has been great fun! As always, thank you to Amy Warden for hosting this wonderful learning adventure! 
 I am always amazed and learn so much from all of you other wonderfully talented Soapers!

I hope you all have a wonderful day!
~ Eva

Wednesday, April 13, 2016

Great Cakes Soap Challenge ~ Location Theme Soaps

April 2016 Soap Challenge by Amy Warden of Great Cakes 
Soap-works!

Location Theme Soaps ~ Oregon!

The Location I chose for my Soap theme is Oregon. Specifically Central Oregon, as this is where I grew up and really became part of me. I really miss the beautiful Cascade mountains, and the high desert! Not everyone realizes that East of the Cascade mountain range in the NW is very dry - 10" or less or rain a year average. Juniper and Sagebrush is abundant with vast Evergreen forests in the mountain range.
 I chose a scent blend that reminds me of when the rain would finally come on a hot day, hitting the hot sand, Sage, and Juniper. It was so wonderful and difficult to describe!

 Here is how I created my Soaps!
My entry:
Cascade Mountains
  Here are a couple photos that i borrowed features from. These are the mountains know as the "Three Sisters" and "Broken Top" is on the left in the bottom photo. The top one is within 5 miles from where I actually lived! I was a country girl, and am so happy I was!

 I used ingredients that remind me on Central Oregon. Sage powder, Illite Grey Clay, and Woodland Green Oxide, to mimic the colors of the Sage, Sand and Juniper. Juniper Berry, Juniper Leaf, and Mint for the Scents of the High dessert, and the common cultivation of Mint field and distillation. I added just a tiny amount of Honeysuckle and Frankincense for the scents i remember hiking at Smith Rocks State Park with the Sun warming the grasses and flowers in the springtime.

White was made with titanium dioxide, Blue skies with Cobalt Blue UM Powder. 
My plan was to have all 3 of the 3 Sisters Peaks, however, my Batter became super thick and my Sky had to be forcibly tamped into my mold, and I lost my middle mountain! It also created quite a few air pockets. 


All and all tho, I enjoyed making this Soapy memory of the place i still miss as "Home".
The scent blend really fits well, being is it 3/4 Juniper Berry, and the remaining 1/4 a blend of the Juniper leaf, and other EO's. The Sage powder added a slight scent too contributing nicely. 

 I look forward to seeing everyone's entries. I imagine you will have some terrific creations. 
Thanks again to Amy Warden for Hosting this fantastic learning platform!!! : ) 

Friday, February 26, 2016

Eva's Soap Basket ~ Large Double Batch of Lavender and Peppermint!

February 26th Fresh made Soaps!


Lavender & Chamomile + Juniper Berry
&
Peppermint, Orange & Patchouli


 I started with a Large 8 pound batch of Oils. My recipe included: Pomace Olive Oil, Coconut Oil, Castor Oil and Shea Butter. 
Colors in both batches were made using Oxide colorants ~ these are skin safe, 'Nature identical' color powders.
 I combined my Lye solution and Oils at 105 degrees.

First batch was a Lavender Soap. I used 3 oz scent total for a 3.5 lbs batter. 
50% Lavendin EO, 1/4 Lavender & Chamomile EO/FO blend, and 1/4 Juniper Berry EO.

Here it is after the pour and dressed up with Lavender flowers on top!
It smells wonderful!


Here are some of the cut bars! Some Glycerin rivers developed in the pattern, but they flow with it. Glycerin is a natural part of Handcrafted Lye soaps. Most of the time it is not visible.  Sometimes it develops Glycerin 'rivers' like seen in these bars ~ the faint, more translucent swirls. It is just proof of the Handmade nature, and uniqueness between each batch ~ different temperatures, oils and techniques contribute to each Soaps individuality!
 These smell so wonderful!!


~~~~~~~~~~~~~~~~~~~~~~~~~~~~~~~~~~~~~~~~~~~~

 Then I made my Peppermint Soap ~ Peppermint is a favorite for many ~

I combined Peppermint, Spearmint, folded Orange, and Patchouli.
4 oz EO for 5 lb batch of soap batter.
Dried Peppermint leaf powder.
1/2 Peppermint, 1/4 Orange, 1/8 Spearmint & 1/8 Patchouli.  ( I fogot the Spearmint bottle in my photo).
This smells fresh and bright!


I hope you have a great day!
: )


February Soap challenge - Winter Wonderland - natural colors

Great Cakes Soap Challenge 
 February 2016 Winter Wonderland - hosted by Amy Warden

Winter Wonderland theme using Natural colors!


Dreaming of a walk in the Sunshine on a Snowy day : )

Colors used: Anatto (orange/yellow), Kaolin clay (whitish), Brown clay, Alkanet (pale blue in embeds), Activated Charcoal (Black).


I had researched colorants, and experimented well in advance. However, due to a busy month I felt that I had to force this project for the challenge for some reason. There were just other things I preferred to do when I had time. So I did not try to have this entered. It was too soft to cut on time, and i feared it wouldn't be worthy of swapping. 
 I still enjoyed this so very much though! I learned bunches actually using natural colorants I had never used. I learned not to try using Pomace Olive oil ( tooo green) but it was all i had on hand. I wasn't able to whiten the batter to my liking for snow. I took a small portion and 'overdosed' it with Kaolin clay for white accents.
 Here are some photos of my experiment and steps i took! 

I chose to experiment with extraction of colorant with 3 liquids. Water, Glycerin, and Sweet Almond Oil. I had read recommendations for some colorants as far as if they dispersed best in water or oil, but wanted to actually see the difference for my personal education.

I had imagined a person skiing or walking down a snowy hill. I used Activated Charcoal for the legs, and connected them while soap was soft. The pale pink was to be arms, and the Orange heart a Sunloving face/head. A simple stick figure type of person.
 I had experimented with the Madder and Anatto 2 days prior and used this to create twirly pieces as embeds to create sunny inflections. 

 Scented with folded Orange, Peppermint, Bergamot, and Patchouli. It is fresh and outdoorsy!
 How my colorants looked in the batter prior to pouring. 

And, the final bars after cutting! 
Can your imagine what a dream of walking in the Sun on a snowy day would look like? (It might take alot of imagination here!!! : ) )   The scene is pretty abstract as it turned out!
They smell great!
 Even though I did not enter the Challenge this month, as always, I learned tons of valuable information from everyone else's experiences! 
 It is truly awesome how creative each of the other entrants are - Thanks to everyone for sharing, and Thanks most of all the Amy Warden for all the hard work that goes into this fantastic challenge!
I wish all a wonderful day!
Eva