Great Cake Soapworks Challenge
June ~ Sculpted Soap Technique
French Horn design Soaps

French Horn design Soaps

This months challenge is one I am so happy to have been 'encouraged' to try. It involves using cut out, pre-shaped pieces to drag through stiff soap batter to create a "Sculpted" design. I allows one to carve designs into your loaf of soap that really cannot be achieved otherwise.
I had been wanting to figure out how to make a soap with a French Horn design for a long time. I though this would be a fun shape to try.

(I do not own this Horn! ***This is an original photo from website: www.rjmartz.com ~ they have a beautiful collection of these wonderful instruments.)
Why a Horn? I Have always loved Brass instruments and when I had the opportunity to switch from Trumpet & learn Horn in middle school I jumped at the opportunity. I still have one to play around on,just for fun but never play for anyone but my husband. (He's so patient !!!! : ))
Anyway that's my inspiration for my 1st try. I have other ideas in my head to try, like a fish design for my fish/hunt bars I make. If I have time to get it done before entries end and I post i'll include it. I wanted to get this post going though since time goes sooo fast!!!
I would like a better entry but this is what I have at this point, here's my scupted soap story #1.
I had been making other batches of soap for a nearby Flea Market booth some friends have near Grand Rivers, KY. So I had made my Heart embed with Ed Hardy Fragrance from that soap batch. Then, encased that in a Lemongrass Round embed from batter from another Soap batch. (This was all in June) So I was set with a Round center for my Horn. ( I was inspired to use this by Amy & her Daughters eye example! ~ thanks Amy!)
For my final fragrance I chose Lemon, Sage & Ginger EO & FO blend + 1/2 ms of Cedarwood. It soaped wonderfully and went perfect with the Lemongrass scent of my embed. Yay! Also didn't discolor.
I mixed my lye water full water this time in my recipe ~ I usually do a 10% discount. My average combine temp was 90 degrees.
I used Black oxide and Activated Charcoal for my blacks. Kaolin Clay for the White, and a Blend of Copper Sparkle Mica, Ivory lace Sparkle Mica + a bit of copper/gold glitter for my 'metal' of the Horn itself. I've never really seen a Horn this color, but hey, it's soap and I did my best!

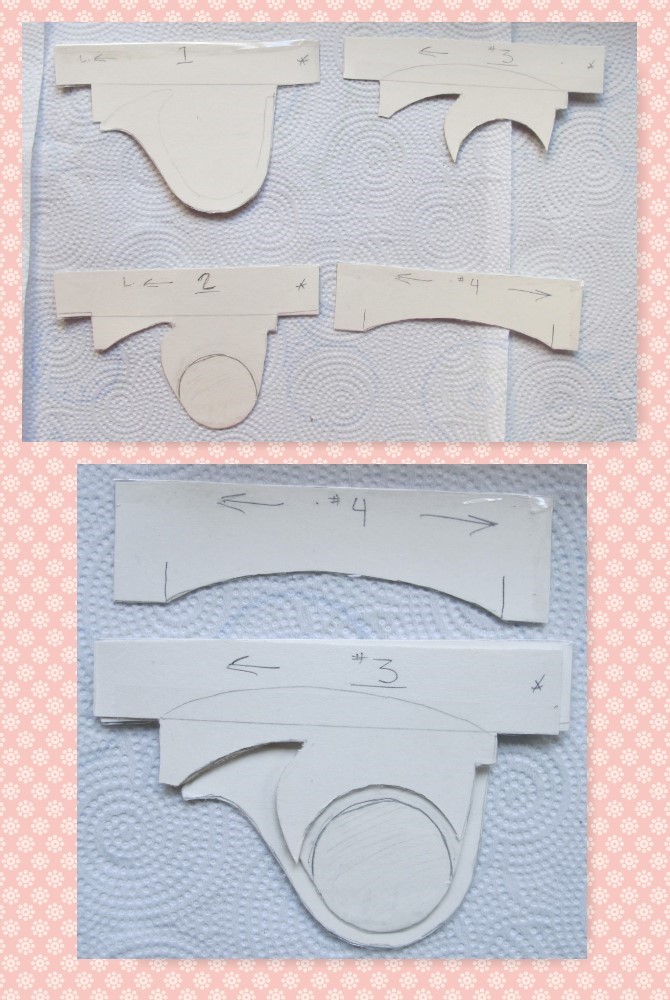
I had first tried to use regular cardboard for my shapers. It was difficult to cut & I still didn't have as smooth of edges as I wanted.

So I tried a thinner cardboard as seen below. This seemed to create a better detailed shape. I covered it in packing tape to attempt to prevent it becoming soggy later in use.
So far so good.
My soap batter was made of 33 oz of Brambleberrie's Basic Quick mix. I added 1 oz of Regular Olive oil (not pomace) I know from experience, the Basic mix allows minimal swirls and firms up well once it begins thickening trace. The Olive oil was to create a little more malleable firmness to shape into, and keep it from turning to hard too soon.
It all started well, I mixed only to very thin trace and divided into 3 pitchers. I did add 2 tsp. Kaolin clay to the whole batch first.
** While I made an honest effort to estimate the amount needed for each section ~ boy was I wrong!!!
I had to quickly make more black to finish the thicker section on the left. That's why in the finished pix, there is a darker layer. I tried to get it ~ was just trying to get it made quickly at that point.
After that, well it just got crazy & I not only forgot to get any pix, but was so messy I would have had to clean up before I could touch my camera!!
I layed down my first Copper layer, and scraped, it seemed ok, but I could tell I would run out of this color also ~ yikes ~ beginning to get anxious now : )
There was no really gentle way to place the embed, so I got as close in as I could and had to let it fall into place hoping it didn't break through the bottom Copper layer.
My batter was remaining soft enough still to be able to whip up more Copper.
The higher tip of my Horn bell flare was wanting to bend in a bit. I was having alot of difficulty getting it the way I wanted. So I started to add the White layer into the shape underneath the Bell to support it & help it hold shape. During this some other colors blurred in and I was feeling frustrated ~ was this even going to work at all???
I finally ended up using the original Cardboard shaper ~ the thinner one had disintegrated in the middle. (i'm so glad i didn't throw out the prototype !)
By this time the remaining batter I had planned on creating a domed top with was getting solid, so I just shlucked it into a smaller mold and squished it down.
I was so happy to finally be done with this wild ride I had to celebrate and throw glitter (confetti!!) on top. I made the top as flat as I could without pressing into the shapes just under the surface.

I was so anxious to see how the soap turned out... did it even resemble a Horn after the torture I put is through? Yes! Yes! Yes!
Not perfect but I am relieved. My husband said he could recognize it, though it could easily be a Snail if the neck was bigger. Ha! He's right, but that's ok.
I included a pic of our Kitty ~ "Boogie" with a Horn I used to have.


I am so excited to see what wonderful things all of you other Soap Shapers have dreamed up!
Thank you to Amy for all that you do. Also Claudia for sharing a treasure of a trick to using in our soapy toolbox!
Have a wonderful day all of you! : )
~ Eva