Order Online

Thursday, June 15, 2017

Great Cakes Soap Challenge ~ June 2017 ~ Ombre Technique

Great Cakes Soapworks Challenge
June 2017
Ombre' Color technique
~~~~~~~~~
My Entry Photo
I realized after making these pics that my flowers on top may not be in withing the guidelines? We are allowed small seeds, but we'll see. If I have to cut the top off of one, I will add it later.


  I have been wanting to make a soap with some Lovespell fragrance I have. This is a good opportunity to try it! The plan is to use Pink as my color. I saw a recent post on the 'Lovinsoap Blog" of a 'floating tigerstrip'. She poured a base layer of white, then tilted the mold and side poured the sequence of colors. This is my plan, only creating the differing layers with the fading shaped of pink. 
  The recipe was my basic recipe including: Olive, Coconut, & Casor oil. I normally reduce my liquid by 15-20%. THIS time i chose to use the full water amount to help with fluidity. I also combined oils /lye at an average of 110. 
 Colors: Crafters choice 1/4 tsp Neon Pretty in pink powder & 3/4 tsp Pink Sparkle Mica. 
The plan, to add some emulified batter to the powders, start first layer rather dark, then keep adding a little of the plain base to the color pot. This should create an increasingly lighter shade. I ended up pouring around 8-10 layers ( I lost count) T
 The batter was so very fluid, that some layers just sank and blended. 
  I had dried flowers from our Redbud trees last spring, and had been waiting to use them on the soaps I made with this fragrance! They dried really well, and have kept their color. I anm curious to see if they morph on the soap.


The fresh poured Soap with Red Bud Flowers.


After 24 hours, the soap was waaaayy to too soft to unmold! I am not used to this. I don't know if I added too much water, or just forgot what full water is like as I always water discount anymore. I had to wait another 24 hours, and went ahead an unmolded anyway. After setting to dry more for another day, I used a wire slicer, to cut. It was still so soft, my fingers left imprints. I will have to clean up more later, but just need to get this done & get back to other real life things.
 Here are some final cut pics. 


I have enjoyed this Challenge as always. Thank you Amy for pushing me to try another fantastic method of Soapy art! 
 Have a wonderful day Y'all ~ Eva


Friday, April 21, 2017

Great Cakes Soapworks Challenge ~ April 2017 ~ Rustic Soap & Packaging

Great Cakes Soapworks Challenge
April 2017
RUSTIC SOAP & PACKAGING

 The Challenge is to make Soaps with a Rustic appearance and simple rustic packaging. Either Hot Process, Rebatch, or Cold Process techniques may be used. I have never tried either rebatch OR hot Process, so that's what I am going to do for this challenge!

Here is my entry:       "Vacay' Bay"
Vacay' is short for Vacation btw ; )


This was my 2nd effort at this challenge theme. The first attempt went ok, and built up my courage to continue!
 For this batch I rebatched a variety of Soap pieces that I have been saving for quite some time ~ like a year!!!  So really old, and some quite dry. They did not have any sign of rancidity, so I felt safe experimenting with this technique. I figured, why not? They had almost been tossed, so I (and they) had nothing to lose, right?
 I apologize for not having pics of all the prep, I was in a mood to just enjoy the journey without the camera at the time ~ a simple time to just get absorbed in craftyness.
 What I did: 
RESEARCHED!!! Most blogs refer to more freshly made soap being rebatched. However, I saw a pattern, whenever soap isn't fresh and 'moist', soapers would lightly moisten the shaved/diced soap pieces & place in a sealed container. They would be allowed to absorb the liquid for anywhere from 2 - 24+ hours. This was supposed to soften the soap scraps enough to be able to melt down.
My plan: 
 I sorted my scraps into 3 color piles. White, white w/ some brown, & black. All scraps were naturally colored with Clays and Activated Charcoal. All were made with a recipe including Olive oil, coconut, castor oils, and Shea Butter. 
 I diced the scraps into tiny 1/8 to 1/4 inch bits, figuring the smaller the pieces the better absorption of liquid. The colors were placed into separate plastic containers with good sealing lids. I started with 1/4 Cup Kombucha Tea divided between the containers, and shook to coat all the bits & pieces. These sat 24+ hours to soften. I shook them a couple of times just because i could & to make sure liquid didn't sink to the bottom.

It was recommended by several soapers, including our host Amy Warden, to use Yogurt 'after the cook' to help with fluidity. I made sure to have some handy.
I also made sure to have a spray bottle with water handy to spray my soap occasionally during the melt down if things were drying out.
 I wanted 3 distinct colors. The black scraps were the smallest amount, so I added a few of the white pieces to the black. this would lighten up the color so I could add Blue oxide ~ going for Navy blue. Plus it helped equal out the amounts of batter for my layers. 
I used a 3 crock cooker we almost never use otherwise. This allowed me to melt down my soaps & keep the sorted colors separate.  
 This batch will be scented with Crafters Choice "Bay Rum" ~ my first time using it. 
~ No I don't have a brick kitchen! I was under our carport ~ the weather has been fantastic, just perfect for an outdoor soap kitchen! :)


Here's some shots of my color steps ~ 
I used Blue Oxide powder, NOT Indigo in this blue, i didn't catch it soon enough. Yellow Oxide for yellow layer, and Titanium Dioxide to lighten the white. 
 I may have used more water than necessary. The batter melted well enough, though there were stubborn white pieces that stayed more solid. I have more learning to do! 

After the soap scraps were melted as far as they seemed they would go, I added the colors, stirred. Yogurt & Argan oil ~ mixed well, then let sit 5 minutes. I then added the fragrance to each color. 
** Throughout the process, as I checked progress & stirred I would spritz water, to keep too counteract the evaporation.
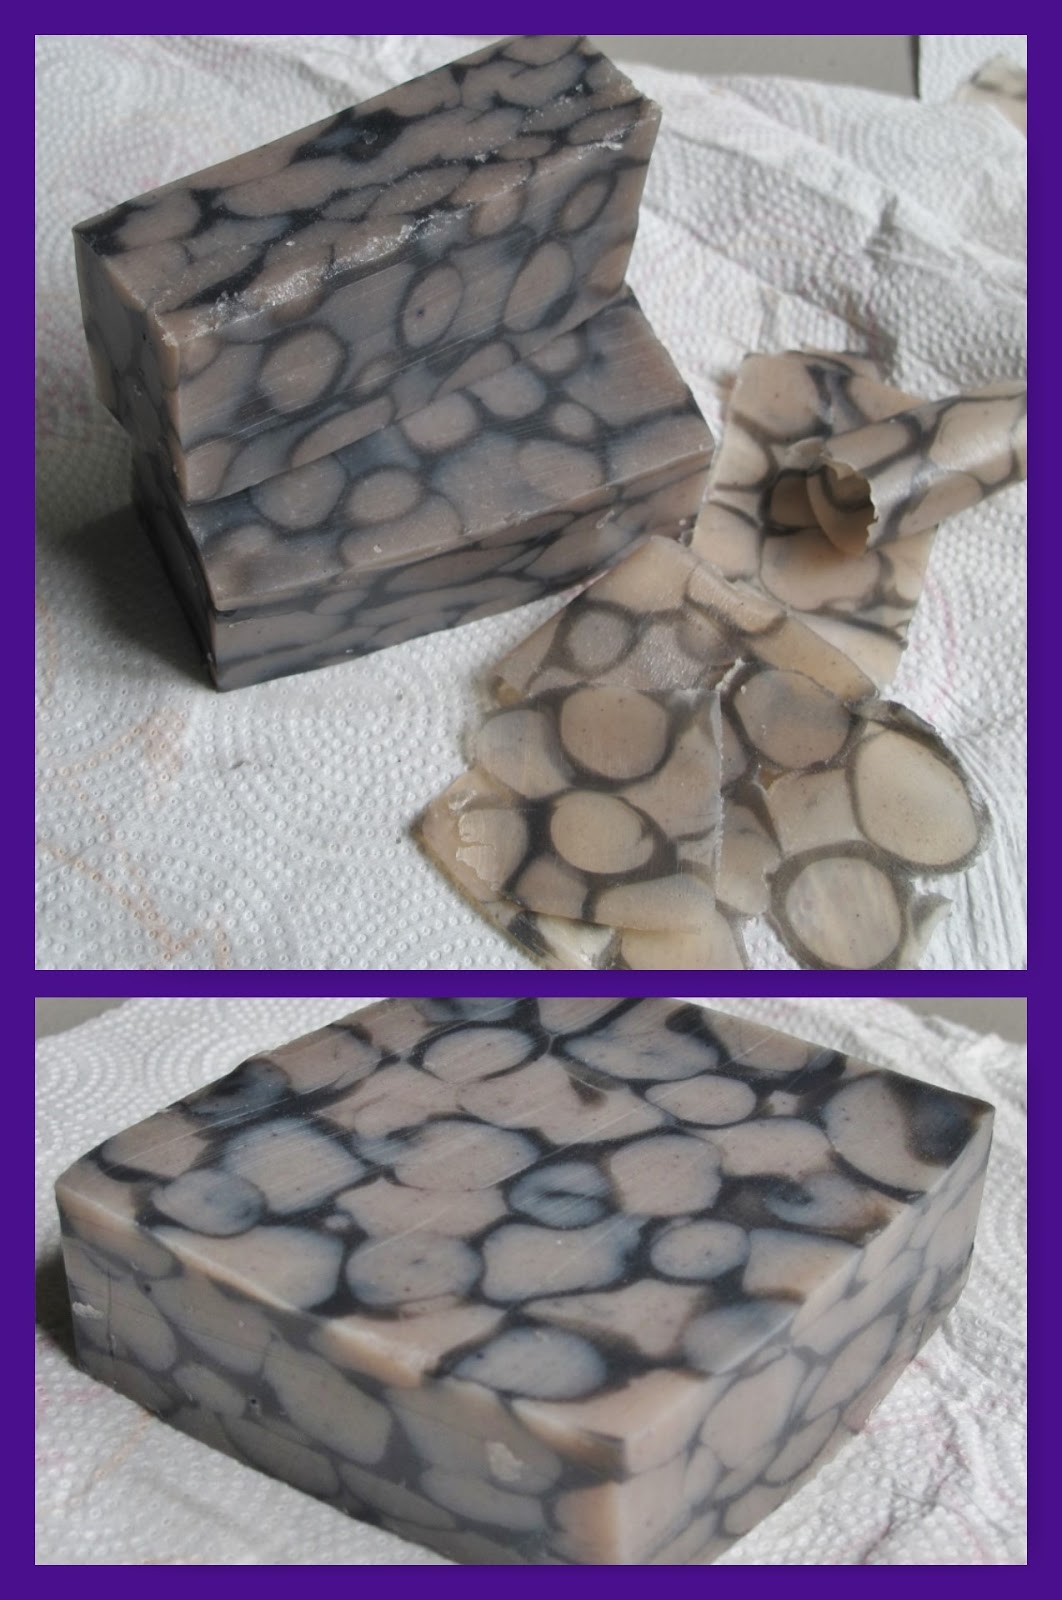
 Ready to put in the molds !!! Bottom: Yellow. Middle: Blue. Top: White. I expect small white bits throughout, from the dryest bits, but I am absolutely thrilled these soap scraps are getting a new life!!! YAY!

 The batter was still fluid enough I was able to do a simple hanger swirl. 
The packaging was kept simple by layering white denim, cut narrow, topped with a pretty ribbon cut to a matching size. Tied with a little bow to hold them in place. The label is just for the soap name ~ not the ingredients like I would normally do.

A few more finished pics from my 2nd batch .


        ~ BATCH ONE ~

I recently made a special request Soap with Frankincense and Myrrh fragrance. I did not feel the scent came through strong enough, so I chose to try rebatching 4 of the bars & add more scent. This soap was 2 weeks old.
 Here are some of the steps:
 Most of the soap was one color with petals on top, and a simple pencil line. I would cut out the pencil line, and repurpose them as embeds. The petals I would pull off in case I chose to reuse them on these soaps. The rest I cubed up, and used a salad shooter to shred up. I added 1/8 Cup of KT to a ziplock bag, added the shredded soap, shook & let sit sealed while I prepped everything else. The smaller embed cubes, I sealed up separately. I planned on heating them lightly in the oven, to better stick to the melted soap. 

The embed pieces got a dry'ish crust on them. I warmed them too soon! I didn't gauge the time well on how long the shredded soap would take to melt. I spritzed with water to try to 'save' them while they waited. I also spritz with Rubbing Alcohol before embedding... Never done this method before so, hey i'm learning as I go!
*Here are some pics of the melting stages. I used the Microwave method for rebatching. I read up, and felt confident this could work. I was ready to use SMALL amount of time, and watch like hawk!


After melting to a nice smooth texture, I added Alkanet powder, infuse in Argan oil. I added between 1/2 to 3/4 tsp before enough color showed. ~ this is a 1# batch.
 The last pic of of 1 'before' bar, and 2 'after' bars. The embeds seem like they may not be super durable, but time will tell. 

 This has been super fun, and confidence building for me! I have been 'needing', and wanting to try rebatch, and just couldn't make myself do it ~ thus the pile of old scraps!
 So THANK YOU Amy for the inspiration to get me going in this awesome and practicable direction! 
 I plan on trying regular from scratch HP soon as well. It seems much less intimidating now ~ yay.
 Thanks to Amy Warden of Great Cakes Soapworks and all the wonderful Ladies she had helping with the soap jury this time! Kenna Cote, Tatsiana Serko,  Jelena Vasiljeva, and Lori Kimble. :)
. Thank you all!
 I look forward to seeing everyone's entries! 

Have a nice day ~ Eva  :)

 Check out my Etsy Store to see what Soaps are available now!   evassoapbasket.com     


Wednesday, March 22, 2017

Great Cake Soapworks March 2017 Challenge ~ Secret Swirl technique

Great Cakes Soapworks Challenge
March 2017 ~ Secret Swirls
Hostess ~ Amy Warden


MY ENTRY  ~   Blue Jay Feather
All Natural Soap

This months challenge is one I had admired in other Soapmakers designs for quite some time. It involves creating a design 'hidden' inside until the soap loaf is cut to reveal it. Most designs create versions of the 'feather' or tree/flower' swirl. Layers of alternating colors are made in the center section either free hand or with assistance of divider tools. After the dividers are carefully removed, a horizontal tool is used to either pull up through the color layers OR push down through with ONE movement only. 
 I chose as my inspiration, the spunky Eastern Blue Jay. We have several that hang out around our house. They have such gorgeous colors, and several feather patterns.


This Soap uses an all natural recipe.
*** Ingredients in order of % used: 
Olive oil, Coconut oil, Kombucha Tea, Kombucha SCOBY, Heavy Whipping Cream, unrefined Shea Butter, & Castor Oil. Colored with: White Kaolin Clay, Indigo Powder, Activated Charcoal powder/Coconut, and Madder Root. SCENT: Orange 10x EO from Brambleberry, and  Dark Patchouli EO from Bulk Apothecary. (1 oz. total EOs with 1/2 oz. of each EO.)
Kombucha contributed to tanning the base color.
 I used Hazelnut oil to diffuse the A.C., Indigo, and Kaolin powders in. The Madder root I first tried in oil, but found it needed water to release the color from the root. I chose not to put it in the lye solution, since that would ruin the ability to color alternate batter the way I wanted, and I did not want to create another mini batch just for that.


I was able to use my tall/skinny mold I saved from the 'shimmy' challenge! :) I made up 2 dividers by doubling up poster board and covering it with packing tape. 


 I LOVE drinking Kombucha! If you have ever bought it, you know how much it can add up buying bottles at the store! ~ it is way more cost effective to make it at home, and simple to do. More info on Kombucha can be found online, but here are two very helpful places: Kombucha Kamp, and Get Kombucha
 Since I have plenty of Kombucha Tea and several SCOBY on hand, I have started using Kombucha Tea regularly in most of my soaping recipes. 
 For this recipe the Kombucha Tea would lend itself well to the natural tan/earthy look I was looking for as my base, or background color, for my Jay feather. Adding the SCOBY puree further darkens the color. 
 If you are interest in making your own SCOBY puree and using KT in your soap adventures check out Brambleberrys Kombucha SCOBY CP soap tutorials on using KT and Puree in your recipe ~ it really helped me, especially with how to make the Puree. 
 I enjoy the added benefit KT and SCOBY bring to soaps, as it enhances lather due to its sugar content, plus natural probiotic, mineral and vitamin content. 
 I did not discount the liquid this time for my recipe, using the total liquid of 12 oz. 9 oz KTea to dissolve the Lye. i calculated the 3 oz of strained SCOBY Puree, to be 50% H2O, adding up to 10.5 oz liquid. 1 oz Cream = 11.5. I left the other 1/2 liquid for adding the Madder root water later.
 I added the combined Kombucha SCOBY Puree, and the heavy cream after adding the lye solution to the oils. Essential oil blend was added to the warmed oils pre-lye.


At thin trace, Indigo, AC, and Kaolin were each added to appoximately 2 oz batter each. Madder root infusion was added to the main batter pot. The Madder root didn't seem to change the color much. I added close to 1/2 +? and stopped there. I didn't want to overload it! I still have alot of learning to do with natural colorant usage!!! :)

 Sorry I didn't get pics of the actual soap in the mold while doing the color layers :(. I alternated Blue/White/black. Then after pulling the dividers out, I accidentally used my hanger the wrong direction! I pulled up through instead of down! :0  Argh! too late, couldn't do it again backwards.... so tempted!  Oh well. I still like how they turned out, even if my Blue jay feather is more like a stack of WW s. :)). 
 There are also visible glycerin rivers, Probably from adding the Madder root liquid to the batter later. It gave the soaps a crackled look I hadn't planned on! 
 I was going for a vintage/aged looking background, with the blue feather 'on top'. 
 I had so much fun, and plan on doing this again soon! Thank to Amy of Great Cakes Soapworks for hosting this fun challenge! 
  Have a great day everyone!   ~ I can't wait to see what y'all come up with :) ~ Eva


You can see my Handcrafted soaps for sale in my Etsy shop at: evassoapbasket.com

Friday, February 17, 2017

Great Cakes Soapworks February 2017 Challenge ~ CP/MP Soaps!

Great Cakes Soapworks Soap Challenge!
February 2017
Hybrid soaps with 
~ Melt & Pour in Cold Process ~

My Entry: True Colors 


 I mentally went through MANY ideas before settling on the color wheel concept.

Step one:     I chose the 3 primary colors ov Red, Blue, and Yellow. Then mixed them: Red/Blue = Purple. Red/Yellow = Orange. Yellow/Blue = Green. This gave me 6 colors to play with. The color embeds I made from clear MP from Wholesale supplies plus. Detergent free Clear.
Stained Glass liquid colorant was the coloring of choice for a clear color in the MP base.
The Blue and Yellow were fairly straight forward to get the color I wanted. The RED however, took way more than I expected to get a vibrant color. 
 This was fine for the red only. However, I soon found that due to the concentration of colorant in the red, it made it very dominant when mixing for the purple, and orange. I had to dilute the red with clear and add more yellow (for the orange), and more blue (for the purple). The Purple was really still to dark for my taste, but oh well. This was a learning experience in color mixology!!!

 Step 2     I had set up each MP color fairly thin and at an angle for a slightly uneven thickness. Next to cut smaller & fit into the mold. I used round cavity molds. To hold the color pieces in place I added a bit of melted, uncolored clear MP and poured into the bottom. 
  
STEP 3:  The CP recipe  was 65% Lard, 25% Coconut, and 10% Castor. This would give a white CP soap to set off the colors of the MP design. 

 Brambleberry has 2 scents I absolutely have been wanting to soap with. Karma essential oil blend, and Yuzu Cybilla fragrance. I created a 50/50 mix of the 2.  *** LOVE it!!! the Hippy Karma scent with the fruity Yuzu is so fun! It also behaved perfectly well and did no affect the white color ` YAY!
 I soaped the CP cooler than I normally would and it was 112 at pour. The cavity mold would keep it cooler too.
Here's a shot of the wet soaps in the mold, and all of the Soapy Color wheels  cleaned up for show!


I love how cheerful they turned out!


I love this Hybrid Challenge by Amy Wardens Soap Challenge club!
I had never combined these 2 medias before, and discovered a super cool way to get Creative with Soapy designs!
Thank you Amy for hosting this wonderful way to learn and grow! 
I can't wait to see everyone's soaps. What I've seen has been amazing already :)  :).

Have a nice day everyone!  ~ Eva


Saturday, October 15, 2016

Rain Forest Soaps ~ Octobers Wood Grain Soap Challenge

~ Great Cakes Soapworks Soap Challenge ~
By Amy Warden

OCTOBER ~ Wood Grain technique


My Entry! ~ Rain Forest Wood Soap


I used a Friends Homemade Wild Cherry Wine for my Lye Liquid. I planned on this being my base color ~ a tan/pink beige.   It turned a slight orange after adding the Lye. I did not freeze it first, just chilled and kept bowl in cool water while mixing lye in.

I used 3/4 ounce essential oils. 99%  was a lovely EO blend called 'Rainforest' by Crafters Choice. I added only 5 drops of Nutmeg EO, just add a little warm dimension. 
 Other colors created with Activated Charcoal, and Indego Powder ~ added each to one 3rd batter. I left the other portion plain color.
My oils were 100% Coconut oil, with only 1/2 oz of Castor added. 
*Average combine temp was 110 degrees.


After mixing in colors by hand, the batter was thickening quicker than i expected! I kept stirring the batters to keep as fluid as possible.


I used a thin skewer to run back & forth along the 'grain' one time. Then made little circles here and there for knots.

Below are the loaf after I planed it with a cheese slicer. Then I made some bigger cuts deciding which way was best.

 Some finish cuts shots

Another fun challenge! I look forward to seeing everyone elses soaps too!
Thanks to Amy Warden for Hosting this great learning experience!

Have a nice day ! ~ Eva

Saturday, September 17, 2016

Great Cakes Soap Challenge ~ Piping technique!

Great Cakes Soapworks Challenge by Amy Warden

~ Piping Technique! ~ 
Floral Guest Soaps ~ White Tea & Ginger scent

  It's time for another of Great Cakes Soapworks fantastic challenges!  For me this was really hard! I have always admired Piped soaps, but had not really been driven to try doing it. That is why entering these challenges are soooo awesome ~ they make me go where i have never gone before in my soapy universe! :)

 I chose to try a floral guest soap theme. 

Here is my entry! 


 Using a Lard 37%, Coconut 25%, Castor 12.5%, Olive Oil 25%. I combine Lye & Oils at low temp, close to 80-85 degrees.
 I used Brambleberrys White Tea & Ginger fragrance in the main batter ~ Awesome scent!
 The tips I used (experimented with) were # 67, 98, 101. I didn't have a smooth 'smile" tip, so my Chrysanthemums look more like Hens & Chicks!! Oh well ~ i like hens & chicks :))
 The batter was still too mushy when I first put it in the bags, I just had to keep trying & experiment. It took close to 1 hr ++ to get a consistency that would hold shape. 

 The texture looked weird & grainy to me. I never did stick blend at all, so I wonder if that had something to do with it? *I plan on using a blender next time I try piping to compare the texture.
 I didn't take pics of all the first disasters, and the first ones that resembled anything did not show any of the color variation from the mixed bag. So I didn't use them.
 I let my flowers & leaves set up separately. It took a few day actually for me to get back to making the bases in the guest mold. I just placed the leaves & flowers on the soap I blended to a thick trace before pouring/glopping into the mold.
 I like the look of the little guest soaps! I don't think they would be very practical to use tho. Once I get better at lower profile shapes I will try again!
 More finished photos!

 I have a loooong way to go learning to pipe soaps better, but have loved trying! 

 Thanks to Amy Warden for hosting this challenge ~ fantastic learning opportunity ~ as always~ :))

 Also thanks to all those that shared such fantastic tips to learn with.
Have a wonderful Day ~ Eva

Saturday, August 13, 2016

Great Cakes Soapworks Challenge ~ Dancing Funnels

Great Cakes Soap Technique Challenge for August 2016
Hosted by ~  Amy Warden

 ~ Dancing Funnels ~
taught by Tatsiana Serko of:  Creative Soap by Steso

 Here is my entry photo! 

 I chose to go with the all Natural category, as I really want  to expand my skills in this department!
I just have not forced my self to learn to infuse them and put them to use. Better late than never right? :)
 My very first attempt wasn't really serious, it was a combination of  Dancing funnel (mainly just using the bottles) on the bottom and swirl on upper half of the loaf. I like the variation using the sqeeze bottles can add to the design. (The pic of this is my Lemon Eucalyptus & Ylang bar on instagram.(@evassoapbasket).
 My first serious attempt I used Safflower petals in the Lye water. I should have either used more petals or a different infusion method i think. I did not get very much color out of this, using 2 heaped tsp of petals to the lye water for a 1# batch of oils. What color shows in the Lye bowl, disappeared once mixed with the oils. :(.   The border color was made adding Indigo pwdr to 1/4 or the batter.
(oils were: olive, coconut, castor, and shea butter)

 While I had reached emulsion, I found it way to thin. The borders would fade away so easily when adding the center. Next time i will make this portion darker! I did pour the lye water through a strainer to catch the petals. I did not take a pic of my first batch bars yet. Will add later hopefully. They just became a blurred mess from being too runny. Oh well, it's still good soap, and a fine learning experience! They may become interesting embeds : )

 My second and final try, as I was out of time... 
 Oils were 100% Coconut oil with a superfat of 22%. Scent was created using 9ml Tea Tree, 9ml Basil, and 6ml Tangerine essential oils. It smells awesome! After I added the Tangerine, I though it might have been a bad idea due to the orangey color of the oil. It likely affected the color of my batter slightly.
 Heres some pics of the process: 

Alkanet in the Lye water for 20 min while cooling. Strained lye solution while adding to the oils. The color in the bowl is mostly from the powder suspended in the water. It really did not leach out as much as I though. (another lesson!!)


After bringing to a thin trace (I did used the blender a short bit this time.) I divided the batter into my pour bottles, and added the Activated charcoal to 1 bottle (1/4 of the batter).
 1st pic is my first layer in the bottom of my mold. (a cut off Almond mild carton ~ pretty fancy huh?)
 As the batter was thickening up the last 3-4 'layers' i had to lightly tamp it to flatten my surface as I went.
 I recently brainstormed my own 'Brick Oven" to help my soap gel. Using a countertop burner (with a flat/solid surface) Starting close to an hour ahead of time, I placed two cement house bricks on it & turned it on just enough I could tell it was warming them slowly and evenly. By the time I was done with my pour they were close to 180 degrees. I turned it off, set my mold on them and covered it with a cardboard box. 


 I was able to cut after 5 & 1/2 hours (this is why is tried 100% coconut oil!!) I did this this morning, and final entries are 2:00 today!!!


My 'loaf' after unmolding and planing with a cheese slicer. Then another final cut pic.
I like using the squeeze bottles for the interesting affects for sure.
Thank to Tatsiana Serko for sharing this wonderful technique! : ) My appreciation and thanks to Amy Warden also for hosting this terrific learning platform! : )
I look forward, as always to seeing all the other awsome soaps! I always learn tons!

Have a wonderful day everyone! ~ Eva